
Contrary to common belief, making an old house comfortable isn’t about a more powerful furnace; it’s about mastering the physics of your building’s envelope.
- The temperature you feel is dramatically influenced by invisible factors like humidity, air movement, and radiant heat from surfaces.
- Targeting these factors with scientific precision provides more comfort and energy savings than simply turning up the thermostat.
Recommendation: Before considering any expensive upgrades, start with diagnostics. Use a simple hygrometer and incense stick to understand your home’s unique thermal dynamics.
For owners of older properties, the winter months often bring a familiar frustration: the thermostat reads a comfortable 21°C (70°F), yet a persistent chill lingers in the air. This forces a constant, costly battle with the heating system, pushing temperatures higher and higher with diminishing returns. The conventional wisdom points towards expensive, disruptive solutions: replace the windows, overhaul the HVAC system, or gut the walls for new insulation. While these have their place, they often act as a brute-force approach to a problem that requires more finesse.
These large-scale projects overlook a fundamental truth of building science: true thermal comfort is not just about air temperature. It’s a complex interplay of environmental factors that trick your body into feeling warmer or colder. The draft from a window, the cold radiating from an uninsulated wall, and the dryness of the air all conspire to steal warmth from your body, making a room feel colder than it actually is. The real issue isn’t necessarily a failing furnace; it’s an inefficient building envelope that’s working against it.
But what if the key wasn’t more power, but more precision? This guide abandons the “bigger is better” mindset and embraces a scientific, solution-oriented approach. We will delve into the physics of hygrothermal comfort, exploring how you can manipulate the invisible forces within your home—humidity, air pressure, and radiant heat—to achieve a profound sense of warmth and well-being. By understanding these principles, you can transform your existing HVAC system from a blunt instrument into a highly efficient tool.
This article will dissect the core issues one by one, providing practical, evidence-based strategies. We will explore why dry air makes you feel cold, how to scientifically hunt down the most significant air leaks, and how to program your thermostat to work with, not against, your home’s unique thermal properties. This is about making your system work smarter, not harder, for a truly comfortable older home.
To navigate this scientific approach to home comfort, this article is structured to build your understanding from foundational principles to advanced applications. The following sections will guide you through each critical aspect of mastering your home’s thermal environment.
Summary: Achieving Optimal Thermal Comfort in Older Homes Without Replacing the HVAC System
- Why 21°C feels cold in winter if your indoor humidity is below 30%?
- How to identify and seal air leaks around windows using incense sticks?
- Spray foam vs. Fiberglass: which is better for retrofitting an attic?
- The placement error that causes your thermostat to misread the room temperature
- Programmable thermostats: setting the perfect pre-heating curve to save money
- Why sticking to gas heating could cost your business double in taxes by 2030?
- Why harsh overhead lighting increases cortisol levels in the evening?
- Switching to Low-Carbon Energy Sources: ROI Calculation for Small Businesses
Why 21°C feels cold in winter if your indoor humidity is below 30%?
One of the most misunderstood aspects of thermal comfort is the powerful role of humidity. When indoor air is extremely dry, typically below 30% relative humidity (RH), it acts like a sponge, drawing moisture from any available source—including your skin. This process of evaporation creates a cooling effect, a phenomenon known as evaporative heat loss. Your body is actively losing heat to the surrounding air, making you feel chilled even when the thermometer shows a perfectly reasonable temperature. It’s the same reason a breeze feels cool on a hot day; it accelerates evaporation from your skin.
In the winter, cold outdoor air holds very little moisture. When this air is brought into your home and heated, its relative humidity plummets, creating the bone-dry conditions that lead to discomfort. You instinctively reach for the thermostat, but raising the air temperature to 23°C or 24°C is an inefficient and expensive way to counteract a problem that isn’t about a lack of heat, but an abundance of dryness. The solution isn’t more heat; it’s more moisture.
Building science organizations have defined a clear target for this. For optimal thermal comfort and health, it is recommended to maintain indoor humidity levels between 30% to 50% during the heating season. By using a simple, inexpensive device called a hygrometer to monitor your home’s RH and a humidifier to maintain it within this range, you can often lower your thermostat by several degrees and yet feel significantly warmer and more comfortable. This single adjustment directly addresses the hygrothermal dynamics of your space, saving energy and improving well-being.
How to identify and seal air leaks around windows using incense sticks?
Air leakage, or infiltration, is a primary driver of discomfort in older homes. While many homeowners focus on windows, the most significant leaks are often hidden. The “incense stick test” is a classic diagnostic tool, but its effectiveness can be magnified tenfold by understanding the physics of air pressure. On a calm day, simply holding an incense stick near a window may reveal little. To get real results, you must create a pressure differential that forces air through even the tiniest gaps.
You can achieve this by creating a “DIY blower door effect.” Turn on all your home’s exhaust fans—kitchen hood, bathroom fans—and close all windows and exterior doors. This action depressurizes the house, causing outside air to be actively sucked in through every crack in the building envelope. Now, when you light an incense stick and slowly trace the perimeter of windows, doors, electrical outlets, and baseboards, the smoke’s behavior becomes a clear diagnostic tool. If the smoke trail remains still, the area is sealed. If it’s pulled or wisping horizontally into the room, you have found a leak.
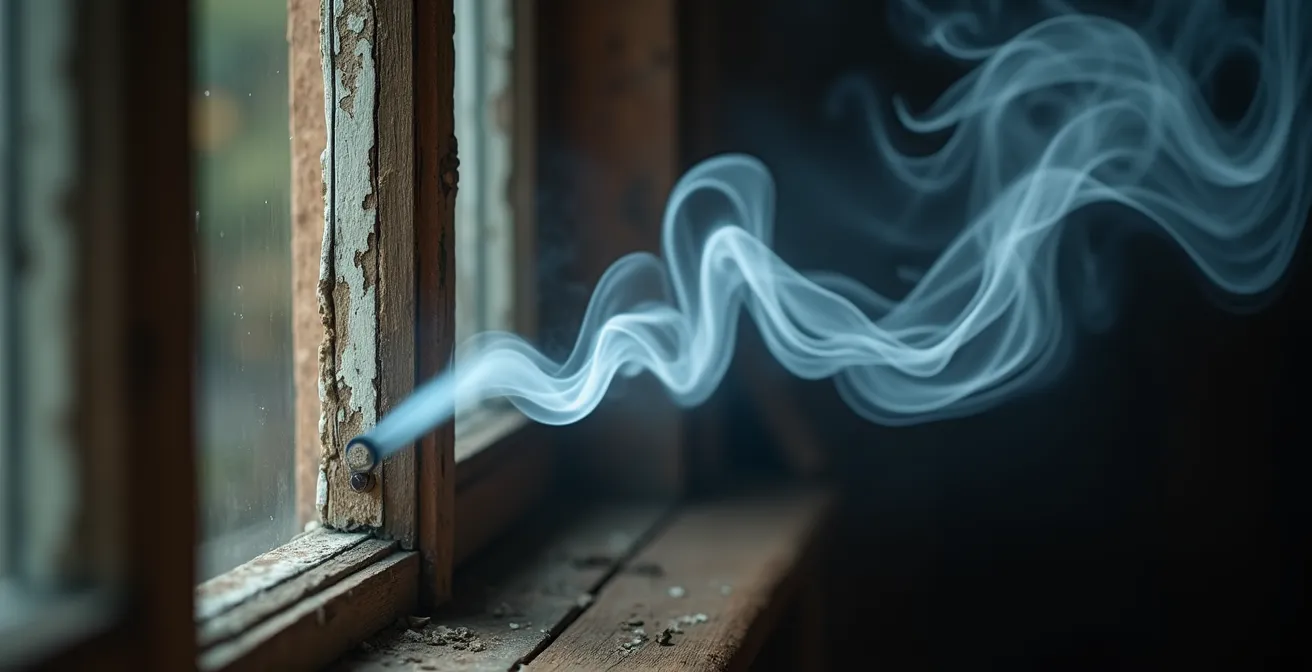
This depressurization technique makes subtle leaks dramatically visible. It’s a method used by home performance professionals to pinpoint energy loss. One crucial insight from this approach is that while windows are common culprits, the biggest offenders are often elsewhere. The stack effect—where warm air rises and exits through the attic, pulling cold air into the basement or ground floor—means that leaks at the very top and very bottom of your house are often the most impactful. Pay special attention to the basement rim joists (where the wooden structure of the house rests on the foundation) and any penetrations in the attic ceiling, such as around light fixtures or plumbing vents. Sealing these areas can yield far greater comfort improvements than focusing solely on windows.
Spray foam vs. Fiberglass: which is better for retrofitting an attic?
Once air leaks are sealed, insulation becomes the next critical layer in your thermal comfort strategy. The attic is often the most cost-effective place to add insulation, as it sits at the top of the building envelope where most heat is lost due to the stack effect. When retrofitting, the two most common materials considered are fiberglass batts and spray polyurethane foam (SPF). While both add R-value (a measure of thermal resistance), they function very differently from a building science perspective.
Fiberglass is a traditional, cost-effective insulator. However, it only resists heat transfer through conduction; it does almost nothing to stop air movement. If you haven’t meticulously air-sealed the attic floor first, air will simply pass through the fiberglass, rendering it far less effective. Spray foam, on the other hand, provides both insulation and air sealing in a single step. As it expands, it fills every crack and crevice, creating a monolithic, airtight barrier that addresses both convective and conductive heat loss simultaneously. This makes it a technically superior, albeit more expensive, solution for complex older attics with many penetrations.
The choice depends on your budget, DIY capabilities, and performance goals. The following table breaks down the key decision-making criteria, based on data from sources like the U.S. Department of Energy.
| Criteria | Spray Foam | Fiberglass |
|---|---|---|
| R-Value per inch | 3.5-6.5 | 2.2-2.7 |
| Air Sealing Effectiveness | Excellent (near-perfect barrier) | Poor (requires separate air sealing) |
| DIY Feasibility | Professional only | Moderate DIY possible |
| Upfront Cost | $1.50-3.50/sq ft | $0.40-1.00/sq ft |
| Moisture Management | Open-cell: vapor-permeable Closed-cell: vapor barrier |
Requires separate vapor barrier |
| Long-term ROI (15 years) | High (30-40% energy savings) | Moderate (10-20% savings) |
For maximum performance in an older home, spray foam is often the better engineering choice due to its integrated air-sealing properties. However, a well-executed fiberglass installation, preceded by diligent manual air-sealing, can still offer a significant improvement in comfort and efficiency at a lower upfront cost.
The placement error that causes your thermostat to misread the room temperature
Your thermostat is the brain of your heating system, but it has a critical flaw: it can only read the temperature of the air immediately surrounding it. It has no idea how warm or cold you actually *feel*. This is a problem in older homes, which often have inconsistent surface temperatures. The primary culprit is a physics concept called Mean Radiant Temperature (MRT). MRT is the average temperature of all the surfaces in a room (walls, windows, ceiling, floor). If you are sitting near a large, cold single-pane window, your body will radiate its heat towards that cold surface, making you feel chilled even if the thermostat on the opposite wall reads 21°C.
This is why thermostat placement is so crucial. A thermostat placed on an exterior wall, near a drafty window, or in direct sunlight will get a skewed reading. If it’s near a cold surface, it will think the room is colder than it is and run the furnace excessively. If it’s in a sunbeam or near a heat source like a lamp, it will shut the furnace off prematurely, leaving the rest of the house cold. This single placement error can lead to wild temperature swings and significant energy waste.
The impact of MRT is not trivial. Studies and tools from building science research centers show that the difference between air temperature and perceived temperature due to radiant heat exchange can be significant. According to analysis using Berkeley’s CBE Thermal Comfort Tool, Mean Radiant Temperature can cause perceived temperature variations of 2-5°C (4-9°F). The ideal location for a thermostat is on an interior wall, in a central location, away from direct sunlight, drafts, and heat sources. It should be placed in a high-traffic area to ensure it’s measuring the temperature where people actually spend their time. Correcting a poorly placed thermostat is one of the highest-impact, lowest-cost fixes for improving thermal comfort.
Programmable thermostats: setting the perfect pre-heating curve to save money
A programmable thermostat is a powerful tool, but most people use it incorrectly in older homes. They set it like an on/off switch, programming it to reach 21°C just minutes before they wake up. This ignores the concept of thermal mass. Older homes, with their plaster walls and solid construction, have high thermal mass; they absorb and store a lot of heat, but they also take a long time to warm up. Asking your furnace to raise the temperature by 5°C in 30 minutes forces it to run at full blast, an incredibly inefficient process.
The solution is to define a gentle “pre-heating curve.” This means starting the heating process much earlier, allowing the system to slowly and efficiently bring the home’s structure—not just the air—up to temperature. The question is, how much earlier? The answer is unique to every home and can be determined with a simple, data-driven method. You don’t need to guess; you can calculate it.
By logging your home’s temperature changes, you can understand its unique thermal performance and set a truly “smart” schedule. This data-driven approach ensures you wake up to a home that is truly, deeply warm, without the energy-guzzling panic of a last-minute heating blast. It’s about working with your home’s inherent properties, not fighting against them.
Your action plan: Determine Your Home’s Optimal Pre-Heating Curve
- Log Heat Loss Rate: On a cold night, turn off the heat after the house is warm. Record the indoor temperature every hour to determine how quickly your home loses heat (e.g., 1°C per hour).
- Measure Thermal Mass Impact: From a cold state, time how long it takes your system to raise the indoor temperature by 1°C. This measures your home’s “recovery time.”
- Calculate Pre-Heat Time: If your home cools by 4°C overnight and your recovery time is 30 minutes per degree, you need at least 2 hours (4 degrees x 30 min/degree) of pre-heating time.
- Set Initial Start Time: Program your thermostat to start heating 2 hours and 15 minutes before your desired wake-up time, adding a 15-minute safety margin.
- Fine-Tune and Observe: Over a week, observe if the house is fully warm on time. Adjust the start time in 5-minute increments until you find the perfect, most efficient pre-heating curve.
Why sticking to gas heating could cost your business double in taxes by 2030?
While the focus so far has been on optimizing existing systems, a forward-looking strategy must consider the changing energy landscape. For small businesses or homeowners who use their property for commercial purposes, relying on fossil fuels like natural gas is becoming a significant financial liability. Governments worldwide are implementing carbon taxes and tightening emissions standards, making gas heating progressively more expensive. The cost is no longer just the price on your utility bill; it’s the added taxes and the declining asset value of a property dependent on outdated technology.
The alternative is electrification, specifically with modern, high-efficiency electric heat pumps. These devices are not the inefficient electric furnaces of the past. A cold-climate air source heat pump can be 300-400% efficient, meaning it moves 3 to 4 units of heat for every unit of electricity consumed. A gas furnace, by contrast, is at best 98% efficient. A 15-year Total Cost of Ownership (TCO) analysis shows that while the upfront cost of a heat pump may be higher, the combination of energy savings and avoidance of future carbon taxes makes it a financially superior long-term investment. Homes with modern electric systems are increasingly seen as assets, while gas-dependent properties may require costly mandatory upgrades in the near future.
For older homes without existing ductwork, ductless mini-split heat pumps offer a compelling solution. They provide highly efficient heating and cooling with the ability to create independent temperature zones, further enhancing comfort and reducing costs. While professional installation costs for mini-split systems range from $2,000 to $10,000, the ROI in energy savings and future-proofing the property’s value can be substantial. Sticking with gas is no longer a default safe choice; it is an active financial risk.
Why harsh overhead lighting increases cortisol levels in the evening?
Thermal comfort is not just a physical sensation; it’s also deeply psychological. The quality of light in a space can trick your brain into feeling warmer or colder. In the evening, harsh, blue-toned overhead lighting mimics the quality of midday sun, triggering a physiological stress response. It can increase the production of cortisol, the “daytime” hormone, which makes you feel more alert and less relaxed. This state of alertness is subconsciously associated with a cooler, less comfortable environment.
Conversely, warm-toned light (around 2200K on the Kelvin scale) mimics the glow of a sunset or a campfire. This quality of light promotes the production of melatonin, the “nighttime” hormone, which fosters relaxation and a sense of cozy security. This psychological effect makes you perceive the room as being warmer and more comfortable, even if the temperature is identical. This is a powerful, no-cost way to enhance the feeling of warmth in your home during winter evenings.
You can create “lighting recipes” to enhance thermal perception without ever touching the thermostat. The strategy is to layer light from multiple, low-level sources to create pools of warmth and avoid activating the body’s stress response. The key principles are:
- Use Multiple Low-Level Sources: Instead of one bright overhead light, use three or more table lamps and floor lamps to create a rich, enveloping glow.
- Choose Warm Bulbs: Select dimmable LED bulbs with a color temperature of 2200K-2700K for all evening lighting.
- Avoid Overhead Lights After Sunset: Rely exclusively on lower light sources to create a calming, “fireside” atmosphere.
- Use Indirect Lighting: Aim some lights at walls or ceilings to create a soft, ambient warmth without the harshness of direct glare.
By curating your home’s lightscape, you are directly managing your body’s hormonal response and creating a powerful psychological suggestion of warmth. It’s a sophisticated comfort strategy that relies on biology, not BTUs.
Key takeaways
- Perceived comfort is a science: Humidity and radiant heat are just as important as the air temperature on your thermostat.
- Diagnostics first, solutions second: Identify your home’s specific weaknesses (air leaks, poor insulation) with scientific methods before spending money.
- Work with your home, not against it: Leverage your property’s thermal mass and a smart thermostat schedule to heat efficiently and deeply.
Switching to Low-Carbon Energy Sources: ROI Calculation for Small Businesses
For any property owner, but especially a small business, the decision to upgrade a heating system comes down to Return on Investment (ROI). Moving away from fossil fuels to a low-carbon source like an electric heat pump is not just an environmental choice; it’s a strategic financial calculation. The ROI is built on three pillars: drastically lower operating costs, government incentives, and future-proofing the asset value of your property against climate-related regulations and taxes.
An excellent strategy for older homes is the “Net-Zero Comfort Zone.” This involves a targeted, rather than whole-house, upgrade. A case study from Lennox demonstrates this principle: by installing a small 1-2kW solar array dedicated to powering a single ductless mini-split in the main living or working area, property owners can create a “free to run” zone of perfect comfort. This allows the old central system’s thermostat to be set back significantly, with the case study showing a 40% reduction in overall heating costs while providing superior, on-demand comfort where it’s needed most. This hybrid approach minimizes upfront investment while maximizing immediate savings.
When considering an upgrade, it’s essential to compare the right technologies for an older home’s specific challenges. A high-velocity system may preserve architecture, but a ductless mini-split offers superior zoning and efficiency, often at a lower installed cost.
| System Type | Installation Cost | Energy Efficiency | Best For |
|---|---|---|---|
| Ductless Mini-Split | $3,000-$10,000 | Up to 30 SEER | Homes without ducts, zone heating |
| High-Velocity System | $10,000-$20,000 | 16-20 SEER | Preserving architecture, whole-home |
| Traditional Central Air | $5,000-$12,000 | 14-18 SEER | Homes with existing ductwork |
The calculation is clear: the combination of extreme energy efficiency, targeted application, and tax/incentive benefits creates a powerful ROI. Investing in a zoned, low-carbon solution is no longer a distant ideal but a practical, profitable business decision for managing the operational costs of an older property.
The logical next step is to move from theory to action. Begin by implementing the diagnostic steps outlined in this guide—measure your humidity, hunt for air leaks, and analyze your thermostat’s performance. This initial data is the foundation for any intelligent, cost-effective upgrade plan.